MFA for macOS
Built specifically for xbar (macOS port of bitbar) this tool is offered in two flavors: with or without (legacy) YubiKey support.
Development of this tool will focus primarily on the YubiKey supported version from this point forward because it allows for significantly better security by default, but I will try to continue working on the older (now referred to as “legacy”) version as I’m able.
Table of contents
YubiKey MFA Support
Current
Notes
- Tested with Nerd Fonts. My preference is
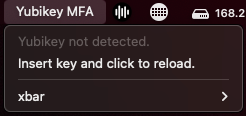
JetBrains Mono Nerd Font, but this can easily be changed to your liking. See theFONTvariable. - If your Yubikey is not inserted when the
xbarapplication loads, or if your key is not detected for any other reason, you may see a “Yubikey not detected” message. Insert your Yubikey and click the “reload” option to refresh the extension and read OATH codes from your device. - Tested and working with Yubikey OATH codes regardless of “touch” setting. If your code has been configured to require touch, no additional prompts will display on-screen, but your Yubikey will begin to flash after clicking the name of the code you with you retrieve. Tap your key as usual and the value will be recorded to the macOS clipboard.
- If you’re experiencing issues with dependencies not loading properly, check your
PATHand modify the variable of the same name in the script. For Homebrew users, you could also consider adding the prefix to the script’s path - for example:PATH="/usr/local/bin:/usr/bin:$(brew --prefix)/bin"
Dependencies
- yubikey-manager -
brew install ykman
Operational Settings
| Setting | Default | Note |
|---|---|---|
ykPassRequired | false | Change to true if your Yubikey has been configured to require a password for OATH use. When true, ykPassword must also be supplied for proper operation. |
ykPassword | YUBIKEY-OATH-PASSWORD | Required when ykPassRequired is true. This value is a plain-text string of your Yubikey OATH password. |
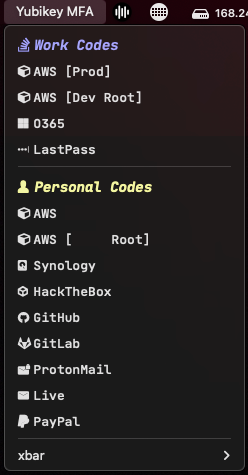
ykOrderOverride | true | OATH codes are read from Yubikey and displayed in alphabetical order. To override this behavior, or to selectively group or omit codes, set value to true. When set to true, you must provide at minimum the values for all three groupPrimary settings (identified below). |
iconEnable | true | Designed to be used in conjunction with Nerd Fonts. If set to true, values specified in the iconArray will be used to “look up” which Nerd Font glyphs should be used with each OATH code from the Yubikey. |
groupSecondaryEnable | true | Enable support for grouping Yubikey OATH keys in two groups. |
Configuration Settings
| Setting | Note |
|---|---|
ykOathList | Intentionally empty. Do not modify. |
groupPrimaryName / groupSecondaryName | Heading name for groups of OATH codes. |
groupPrimaryColor / groupSecondaryColor | Heading colors for groups of OATH codes. |
groupPrimaryList / groupSecondaryList | Array of OATH keys. The format must match the output from Yubikey. To see which keys are available on your device, run ykman oath accounts list. Values must be contained within double-quotes and do not separate with commas (,). |
iconArray | Used only if iconEnable is true. Array of labels paired with Nerd Font glyphs. Separate key/value with a colon (:), use double quotes ("), and do not separate value pairs with commas (,). If an OATH key is found that does not have a matching glyph, a circle and exclaimation glyph will display for that OATH entry. |
YubiKey Terminal Support
Supplemental

This supplemental tool has four (4) modes of operation. It can be executed as a stand-alone script, or integrated into your shell profile.
- No parameter passed.
- OATH keys will be read from Yubikey and you will be prompted to select the number of the key you want to capture. Code will be returned and its value copied to the macOS clipboard.
- Pass “list” as the only parameter.
- OATH keys will be read from Yubikey. They will be numbered, but you will not be prompted to select a number, and no codes will be returned or copied to the clipboard.
- Pass the number identifier for the key you’re wanting.
- The OATH code for the specified key will be returned and copied to macOS clipboard.
- Pass a string containing the name of the OATH key you’re wanting.
- If you provide a partial string, a match will be attempted but could fail if there are multiple possible selections each containing the string you provided. Potential matches will be returned allowing you to make a more specific request.
- You can also choose to provide the entire Yubikey-Manager compliant string identifier:
<identity>:<account>. This will always ensure a positive match if the key exists within the Yubikey you have inserted. - Additional data about the OATH code is omitted from output - this means that only the OATH code itself is emitted and is therefore more suitable for use in programmatic applications.
Notes
- If your Yubikey is not inserted when the script is executed, or if your key is not detected for any other reason, you may see the message “Yubikey not detected.”
- Tested and working with Yubikey OATH codes regardless of “touch” setting. If your code has been configured to require touch, prompts will appear on-screen as required and your Yubikey will begin to flash to indicate contact is required. Tap your key as usual and the value will be displayed on-screen and recorded to the macOS clipboard.
- If you have multiple keys loaded with very similar names, you may have to use the full OATH key name when attempting to retrieve codes by string rather than number identifier. Consider the following examples:
Dependencies
- yubikey-manager -
brew install ykman
Operational Settings
| Setting | Default | Note |
|---|---|---|
ykPasswordRequired | false | Change to true if your Yubikey has been configured to require a password for OATH use. When true, ykPasswordString must also be supplied for proper operation. |
ykPasswordString | some-password | Required when ykPasswordRequired is true. This value is a plain-text string of your Yubikey OATH password. |
Configuration Settings
No additional settings available.
Specifying similarly named MFA codes
You have 3 OATH codes saved to your Yubikey with the following Issuer and Accounts:
* AWS [Prod]:usera@workemail.com
* AWS [Dev Root]:usera
* AWS [Personal]:usera@homeemail.com

You will have difficulty attempting to capture codes if all you are passing to the script is "AWS":

$ ./yubikey-mfa.sh "AWS"
Error: Multiple matches, please make the query more specific.

AWS [Prod]:usera@workemail.com
AWS [Dev Root]:usera
AWS [Personal]:usera@homeemail.com

This can be resolved by passing the full Issuer string:
$ ./yubikey-mfa.sh "AWS [Dev Root]"
You have 3 OATH codes saved to your Yubikey with the following Issuer and Accounts:
* AWS:usera@workemail.com
* AWS:usera
* AWS:usera@homeemail.com

$ ./yubikey-mfa.sh "AWS"
Error: Multiple matches, please make the query more specific.

AWS:usera@workemail.com
AWS:usera
AWS:usera@homeemail.com

In this scenario, the only resolution is to use the full OATH name as known to Yubikey:
$ ./yubikey-mfa.sh "AWS:usera@homeemail.com"
Legacy MFA Support
Deprecated
Notes
- Tested and works well with Nerd Fonts. My preference is
JetBrains Mono Nerd Fontbut this can easily be changed to your liking. - If you wish to ENABLE the default code, consider changing the script name to execute every five (5) or fewer seconds. By default, the script will not display a default code and therefore refreshes only once per day.
Dependencies
- OATH-Toolkit -
brew install oath-toolkit
Operational Settings
| Setting | Default | Note |
|---|---|---|
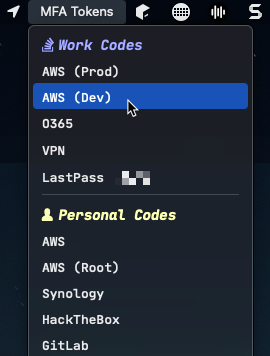
ENABLE_DEFAULT_CODE | false | Causes the “default” code to be displayed in the menu bar. |
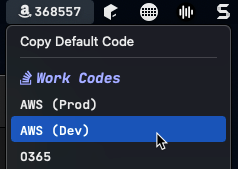
ENABLE_DEFAULT_COPY | true | Adds a “Copy Default Code” option to the top of the menu. If set to false, only the code is displayed in the menu. |
ONLY_ONE_GROUP | false | Causes all groups other than “group1” to be ignored. Heading name for Group 1 will not be displayed. |
ENABLE_SUBMENU | false | Causes codes to be rolled-up under their group heading rather than displayed together in the top level of the menu. |
Configuration Settings
| Setting | Note |
|---|---|
DEFAULT_NAME | Relevant when ENABLE_DEFAULT_CODE is true. Displays a TOTP code directly in the top menu bar. |
DEFAULT_KEY | Relevant when ENABLE_DEFAULT_CODE is true. Displays a TOTP code directly in the top menu bar. |
group1Name / group2Name | Heading name for the group of codes. |
group1Color / group2Color | Heading color for the group name. |
mfaGroup1 / mfaGroup2 | Array of TOTP keys. Format is <name>:<key>. Values must be contained within double-quotes and do not separate with commas (,). |
Legacy Terminal Support
Deprecated
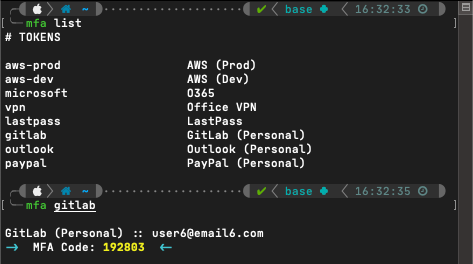
This was the first tool I created to assist in management and use of MFA codes, predating my discovery of xbar. Use requires two files:
- a file with MFA key strings and metadata separated by
tabcharacters - bash script to cherry-pick individual keys and decode the TOTP token upon request
OATH-Toolkit is required. Install with brew install oath-toolkit.
The MFA key file should be saved to your local system with a name similar to .mfa-codes. For the sake of example we’ll say this is saved at ~/.mfa/.mfa-codes. This file should contain information structured as follows:
sh1ort-name, tab-character, mfa-code, tab-character, username (or email), tab-character, long-description, new-line
The contents of the file should look something like this:
# TOKENS

aws-prod	ABC123ABC123ABC1	user@email.com	AWS (Prod)
aws-dev	ABC123ABC123ABC1	user2@email2.com	AWS (Dev)
microsoft	ABC123ABC123ABC1	user3@email3.com	O365
vpn	ABC123ABC123ABC1	user4	Office VPN
lastpass	ABC123ABC123ABC1	user5@email5.com	LastPass
gitlab	ABC123ABC123ABC1	user6@email6.com	GitLab (Personal)
outlook	ABC123ABC123ABC1	user7@outlook.com	Outlook (Personal)
paypal	ABC123ABC123ABC1	user8@email8.com	PayPal (Personal)