Yubikey Open Authentication Configuration (OATH / TOTP)
One of my favorite aspects of Yubikey is the ability to store TOTP (time-based one-time passcodes) directly on the key itself. I use this integration in several different tools, but the one most people associate with it is the Yubico Authenticator. While the app itself is very handy, most of my use comes from script and command-line integration, and a very light-weight xbar script that sits in my macOS menu bar: TOTP for xbar.
To make the most effective use of this, you really do need to have a good strategy in mind for how you want to organize your TOTP codes and harvest them. We're all familiar the process of having to scan a QR code to setup MFA in an authenticator app that then provides us with 6-digit codes rotating every 30 seconds. Those codes are usually scan-and-forget because they're now tucked away in your authenticator app of choice.
But when happens when you get a new phone? Does the app you used support transferring all of those codes to a new device, or are you going to have to go through the pain of setting them all up again?
TOTP Harvesting
There are typically two options:
-
When you're presented with the QR code to scan, some apps give you a link that will reveal your TOTP Seed string. Save that string in your password manager before setting up the MFA in your app of choice.
-
If there's no option to get the TOTP Seed string, I snap a photo or screenshot when I'm away from home, or grab a screenshot when I'm sitting at my desk. Using a tool called Zbar (get it via Homebrew) I can decode the QR code from the macOS terminal to get the full TOTP URI.
For demonstration purposes, I grabbed a quick demo QR code from GitHub and took a screenshot of just a single QR code.
$ zbarimg --raw ./Downloads/temp.png

otpauth://totp/Amazon:jdoe@gmail.com?secret=VOHJXBL54OM2TTLKANOUUCJTE7PXVOIV&issuer=Amazon&algorithm=SHA1&digits=6&period=30
scanned 1 barcode symbols from 1 images in 0.02 seconds
The format is otpauth://TYPE/LABEL?PARAMETERS, and the parameters contain all of the data needed by authenticator apps like Authy or Google Authenticator. The secret parameter (VOHJXBL54OM2TTLKANOUUCJTE7PXVOIV) is the seed we need.
TOTP codes mostly follow the same format:
- Algorithm =
SHA1 - Digits =
6 - Period =
30(seconds)
Years ago, I got into the habit of grabbing this URI for every QR code and saving the output in my password vault, Strongbox. For each entry, I create two custom fields, both marked as Concealable, where one I named "TOTP URI" and the other "TOTP SEED".
- TOTP URI:
otpauth://totp/Amazon:jdoe@gmail.com?secret=VOHJXBL54OM2TTLKANOUUCJTE7PXVOIV&issuer=Amazon&algorithm=SHA1&digits=6&period=30 - TOTP SEED:
VOHJXBL54OM2TTLKANOUUCJTE7PXVOIV
If I ever want to move my TOTP codes to other apps or devices, it can be done quickly and easily becuase I've saved a copy of the URI. (Strongbox has a built-in mechanism to display the rotating TOTP codes as well, so I've always got multiple methods from which to acquire a code when needed.)
Where this comes into play for Yubikey, however, is bulk-loading TOTP codes to each Yubikey.
Organization and Naming Convention
If you simply scan the QR code to create the code in your app, different apps give you different options. Some let you rename the codes - others take the values directly from the URI string and you get what you get.
In our example above, the label is Amazon. But maybe you've got multiple Amazon accounts. The format I prefer to use is LABEL [Identifier] because this makes it easy for me to target specific accounts for services where I've got multiple user accounts. Some very basic examples include:
AWS [Production]AWS [Development]Amazon [Work]Amazon [Personal]
The important take-away is that you define a structure that works best for your use-case and be consistent.
Importing TOTP Keys to Yubikey
The new firmware 5.7.x allows up to 64 of these keys to be saved on each key, whereas earlier versions only supported 32. If you have more than 64 accounts that you want to protect, your options are going to be to either prioritize which accounts you want secured by the Yubikey, or use multiple keys for different sets of codes. I wouldn't recommend the latter approach, because that's going to get confusing for you quickly.
Adding keys to Yubikey is simple with the ykman (Yubikey Manager) CLI app.
$ ykman oath --help

Usage: ykman oath [OPTIONS] COMMAND [ARGS]...

  Manage the OATH application.

  Examples:

    Generate codes for accounts starting with 'yubi':
    $ ykman oath accounts code yubi

    Add an account with the secret key f5up4ub3dw and the name yubico,
    which requires touch:
    $ ykman oath accounts add yubico f5up4ub3dw --touch

    Set a password for the OATH application:
    $ ykman oath access change

Options:
  -h, --help  show this message and exit

Commands:
  info      display general status of the OATH application
  reset     reset all OATH data
  access    manage password protection for OATH
  accounts  manage and use OATH accounts
$ ykman oath accounts --help

Usage: ykman oath accounts [OPTIONS] COMMAND [ARGS]...

  Manage and use OATH accounts.

Options:
  -h, --help  show this message and exit

Commands:
  add     add a new account
  code    generate codes
  delete  delete an account
  list    list all accounts
  rename  rename an account (requires YubiKey 5.3 or later)
  uri     add a new account from an otpauth:// URI
Notice that we have an option to add an account by providing the details, as well as add them by using the uri directly. The URI makes for the most expediant method, but I like having more control to name the accounts exactly what I need at the time they're added.
$ ykman oath accounts add --help

Usage: ykman oath accounts add [OPTIONS] NAME [SECRET]

  Add a new account.

  This will add a new OATH account to the YubiKey.

  NAME    human readable name of the account, such as a username or e-mail address
  SECRET  base32-encoded secret/key value provided by the server

Options:
  -o, --oath-type [HOTP|TOTP]     time-based (TOTP) or counter-based (HOTP) account  [default: TOTP]
  -d, --digits [6|7|8]            number of digits in generated code  [default: 6]
  -a, --algorithm [SHA1|SHA256|SHA512]
                                  algorithm to use for code generation  [default: SHA1]
  -c, --counter INTEGER           initial counter value for HOTP accounts
  -i, --issuer TEXT               issuer of the account (optional)
  -P, --period INTEGER            number of seconds a TOTP code is valid  [default: 30]
  -t, --touch                     require touch on YubiKey to generate code
  -f, --force                     confirm the action without prompting
  -p, --password TEXT             the password to unlock the YubiKey
  -r, --remember                  remember the password on this machine
  -h, --help                      show this message and exit
The quickest method I've found for loading keys, is to add them to a shell script, assign it execute permission, and run it while your Yubikey is attached. It makes adding the same set of OATH TOTP accounts to multiple Yubikeys very fast, but it takes time to build the script for the first time.
#!/bin/bash

digits=6
algorithm="SHA1"
period=30

# Load MFA keys to Yubikey

echo "Adding: AcctA [Ident1]"
ykman oath accounts add -i 'AcctA [Ident1]' -a $algorithm -d $digits -P $period 'your@email.com' '1234567891234567'

echo "Adding: AcctA [Ident2]"
ykman oath accounts add -i 'AcctA [Ident2]' -a $algorithm -d $digits -P $period 'other@email.com' '7654321987654321'

digits=7
period=60

echo "Adding: AcctB [Ident3]"
ykman oath accounts add -i 'AcctB [Ident3]' -a $algorithm -d $digits -P $period 'another@email.com' '1234567891234567'

echo "Adding: AcctC [Ident1]"
ykman oath accounts add -i 'AcctB [Ident3]' -a $algorithm -d $digits -P $period 'your@email.com' '7654321987654321'
If you have multiple accounts that require non-standard parameters, you can parameterize the script to group all of your accounts with custom properties together. However, if all (or the majority) of your accounts follow the default standard, you can simplify the script:
#!/bin/bash

# Load MFA keys to Yubikey

echo "Adding: AcctA [Ident1]"
ykman oath accounts add -i 'AcctA [Ident1]' 'your@email.com' '1234567891234567'

echo "Adding: AcctA [Ident2]"
ykman oath accounts add -i 'AcctA [Ident2]' 'other@email.com' '7654321987654321'

echo "Adding: AcctB [Ident3]"
ykman oath accounts add -i 'AcctB [Ident3]' 'another@email.com' '1234567891234567'

echo "Adding: AcctC [Ident1]"
ykman oath accounts add -i 'AcctB [Ident3]' 'your@email.com' '7654321987654321'
Just remember to be mindful of the maximum limit. If you've got one of the newer Yubikeys, you can fit 64 on each device, otherwise your limit is 32.
Interacting with TOTP Codes on Yubikey
To view a list of all accounts currently stored on Yubikey:
$ ykman oath accounts list

AcctA [Ident1]:your@email.com
AcctA [Ident2]:other@email.com
AcctB [Ident3]:another@email.com
AcctB [Ident3]:your@email.com
To request a TOTP code for an account:
$ ykman oath accounts code AcctA [Ident1]

AcctA [Ident1]:your@email.com  476185
When querying, you don't have to enter the exact name, but be aware that if two names are similar, multiple results can come back:
$ ykman oath accounts code AcctA

AcctA [Ident1]:your@email.com      826278
AcctA [Ident2]:other@email.com     876752
You can force ykman to request more specificity in order to reveal a code:
$ ykman oath accounts code -s AcctA

Error: Multiple matches, make the query more specific.

AcctA [Ident1]:your@email.com
AcctA [Ident2]:other@email.com
TOTP with Yubikey and xbar
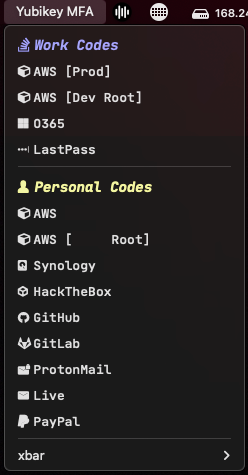
I wanted something simple and quick to use for grabbing TOTP codes of accounts that I use daily, so I created a plugin for xbar that resides in the macOS menu bar. The plugin includes a number of configuration options depending on the volume of TOTP codes resident on your key, the level of organization desired, and includes support for NerdFonts glyph icons.
More details are available under Projects/TOTP/xbar and github.com/bryandodd/xbar.
Yubikey not detected